

Event tracking in Google Tag Manager without writing code

If you want to track events in Google Tag Manager but don’t know how to code, and your developer’s team is always busy**,** this is the tutorial you were waiting for. This is how to set up Event Tracking in Google Tag Manager without knowing how to write code.
What is Google Tag Manager?
Google Tag Manager, in short, GTM, is a powerful tool to include tags (or code snippets) with your landing pages, blog, or web app without bothering your dev team.
No wonder why currently, +40% of all the websites are using Google Tag Manager.
You can control how your tag behaves based on your own logic. You can trigger tags based on events or customized conditions such as Page contains or Consent Given.
We’ll see a couple of examples so you can better understand how to properly track events in GTM.
Each Tag has two things to configure: the Trigger and the Tag.
If you are familiar with the Tags & Triggers, you can skip to the How to track events in Google Tag Manager.
What is a Tag?
I love real-life examples, so let’s imagine you want to install Hotjar or a live chat on a page. You will need to add a custom HTML Tag in GTM with the code snippet of your live chat or Hotjar.
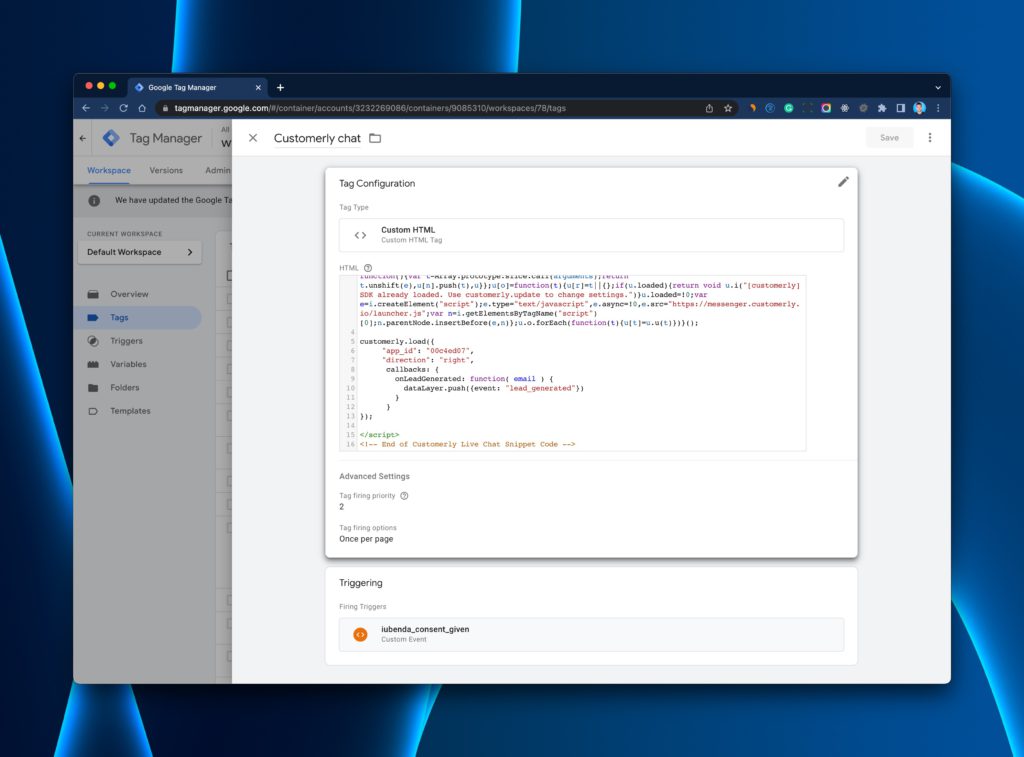
Tags are segments of code provided by analytics, marketing, and support vendors, such as our marketing automation or customer support software, to help you integrate these products into your websites or mobile apps.
After pasting the service snippet in the Custom HTML Tag configuration, you need to decide which trigger will fire this tag.
What is a Trigger?
Again a good example is worth thousands of words: When the page load, then load the live chat.
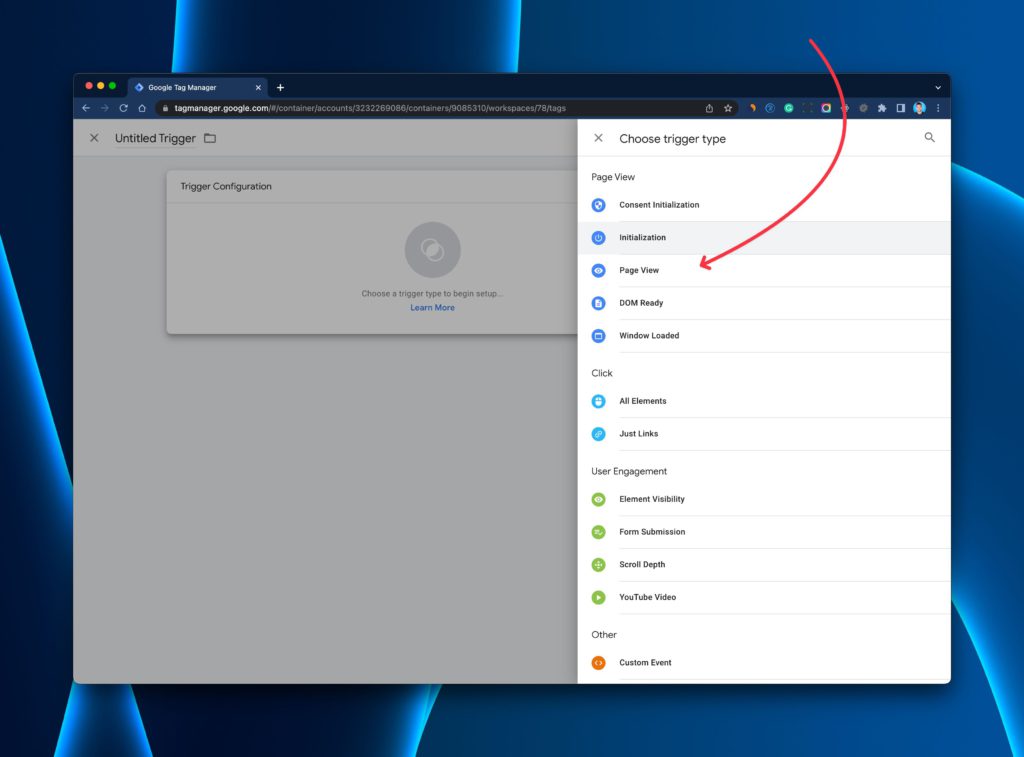
The “When the page load” (aka Page View) is the trigger you can use to Fire the Live Chat Tag.
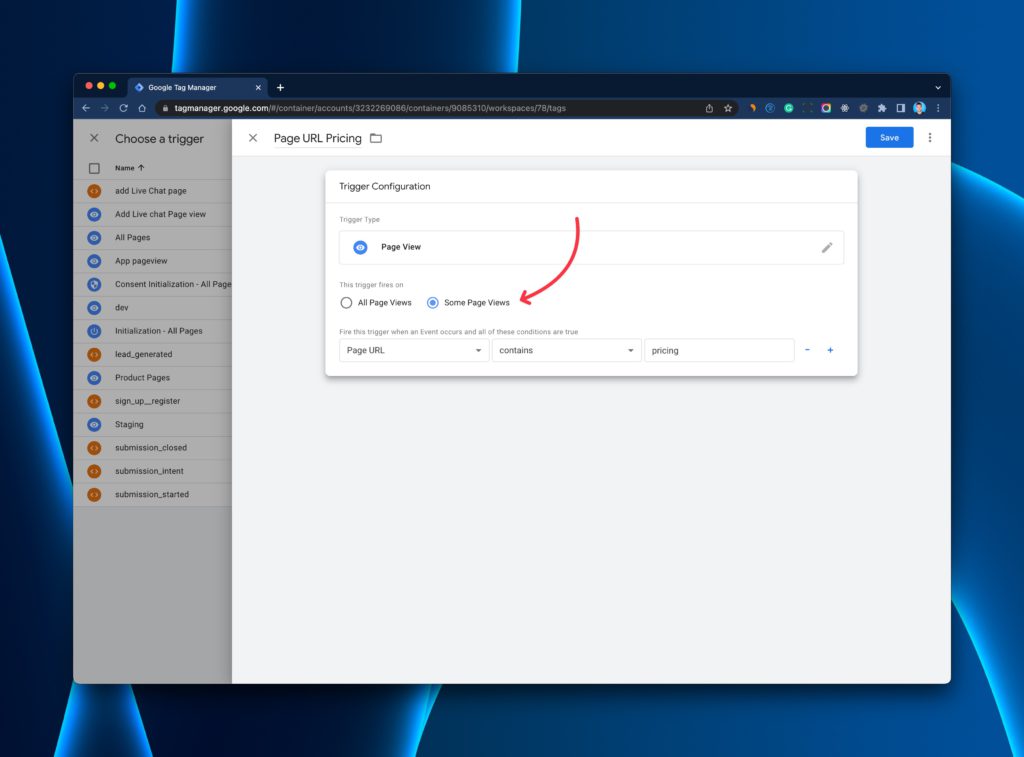
So if, for example, you want to load the live chat only on certain pages, you can create a new trigger on Page View and select “Some Page Views” and choose Page URL containing “pricing” for example.
What is an event in Google Tag Manager?
An Event in Google Tag Manager happens with the page, app, or user interaction.
If you think about it, the trigger is just an event happening somewhere, causing some tag to be fired.
Which Events or Triggers can you track?
If we don’t consider the custom events you can track with the GTM Data Layer, you can use a bunch of powerful pre-defined events (or triggers) that are very powerful.
This is the list of triggers types you can use:
- Consent Initialization: Whenever someone is accepting all your cookies.
- Initialization: When the Google Tag Manager has been initialized. This will be the very first event triggered automatically by the GTM.
- Page View: Whenever there is a page viewed.
- DOM Ready: When the browser has fully loaded the page in HTML.
- Window Loaded: When the page has been fully loaded, including any external script or image.
- Click on All Elements: Track any clicks on any element on a page. This will be our magic ingredient for the NO-Code recipe tracking.
- Just Links: Track clicks only on HTML links
- Element Visibility: When an element on the page is visible in the browser.
- Form Submission: When a form has been submitted
- Scroll Depth: When a user scrolls down a web page a certain percentage of the height.
- Youtube Video: Whenever someone interacts with a Youtube video embedded on a page. For example, Completing or Pausing a video.
- Custom Event: A custom event you trigger using the dataLayer.push({‘event’: ‘custom_event’})
- History Change: When using a Single Web Application you can track when a page has changed.
- JavaScript Error: When an error occurs on the page
- Timer: Use this trigger to send events at certain time intervals.
- Trigger Group: Merge multiple triggers and evaluate if all or some of them have been triggered.
How to set up event tracking in Google Tag Manager?
Ok, now that it is clear to you what an event is and what’s a tag, we’ll see how you can track events in your analytics or marketing tool.
Let’s see a real example.
We want to track the click on this page’s “Get Started” button.
![]()
1 Step: Go to your Google Tag Manager Container, select Variables (on the left menu), and then Configure.
![]()
2 Step: Select all the clicks built-in variables, we’ll need Click Text for this tutorial, but you can also use other variables.
![]()
3 Step: Go to Triggers and then click on New.
![]()
4 Step: Click on Trigger configuration
5 Step: Now select All Elements under the Click section.
6 Step: Select “Some Clicks“. Change the first field to “Click Text” and add your button text. In our example, “GET STARTED”.
You will have something like this 👇
7 Step: Add a recognizable name and save it.
![]()
Now that we have our trigger every time someone clicks on a button with the “Get Started” text, we need to pass the event to our favorite analysis software or behavioral email marketing software like Customerly.
For the sake of this example, we will use Google Analytics, Hotjar, and Customerly Events.
8 Step: Go to Tags and click on New to add a Google Analytics 4 Event based on our newly created trigger.
![]()
9 Step: Click on Tag Configuration and then select Google Analytics: GA4 Event
![]()
10 Step: Add the event name by clicking on the + icon.
![]()
11 Step: Select Click Text as a variable for our event name or customize it. This will be the event name you will see under your Google Analytics dashboard.
![]()
12 Step: It’s time to select our trigger for this tag. Click on the Triggering section to add your trigger.
![]()
13 Step: Let’s select the previously created “Get Started Click” Trigger, and we are almost done!
![]()
Recap: You should have something like the following picture. If everything sounds good, add a name and save your tag.
![]()
14 Step: Time to test before going public with these changes. Click on Preview on the top right.
![]()
15 Step: Add the URL of the page you want to test and click Connect. This will open another page and leave this Tag assistant open.
![]()
Your page will open, and the only thing you need to do is to click on the button you want to track.
If everything is working fine, you will find a Click event on the left column, and if you click on it, you will be able to see the Tags fired with our last Tag created.
![]()
Yay!
Now you can Submit, and let’s go live!
![]()
Add a name to the changes made (make it descriptive for your team)
![]()
This is how you do event tracking in google tag manager without writing a single line of code.
This is tracking only a click event whenever someone clicks on any button containing the phrase “Get Started”.
What if we want to click all the buttons at once?
You don’t have to repeat all the steps; instead, expand your trigger conditions from Some clicks to All Clicks.
Tracking user behavior with Google Tag Manager
We will see how to send automated emails to users who have visited the upgrade page but haven’t started a free trial.
To work with user behavior, we will see another example that will pass all the user events to Customerly (which has a marketing automation suite).
Let’s start!
Step 1: Create a new Trigger based on Clicks All Elements with All Clicks and save it.
![]()
Step 2: Create a new Tag and select Custom HTML.
![]()
Step 3: We need to clean the event name for Customerly and pass the event name with the following code. Just copy and paste it into your Custom HTML Tag.
<script>
  var event_name = {{Click Text}};
  event_name.replace(" ", "_");
  event_name.replace("{", "");
  event_name.replace("}", "");
  customerly.event(event_name);
</script>
![]()
Step 4: Select the previously created trigger: “All Clicks on All Elements”. Save and preview it.
From now on, you will track all the critical events the user performs on your platform.
Automate emails when a user visits the upgrade page
Let’s see how you can follow up via email and encourage a user that visited the upgrade but didn’t perform the upgrade in the end.
So if a user clicks on a button with “Upgrade” text or visits the upgrade page, you can send the event via GTM and get an “upgrade” event in Customerly.
Let’s build together the automated workflow now.
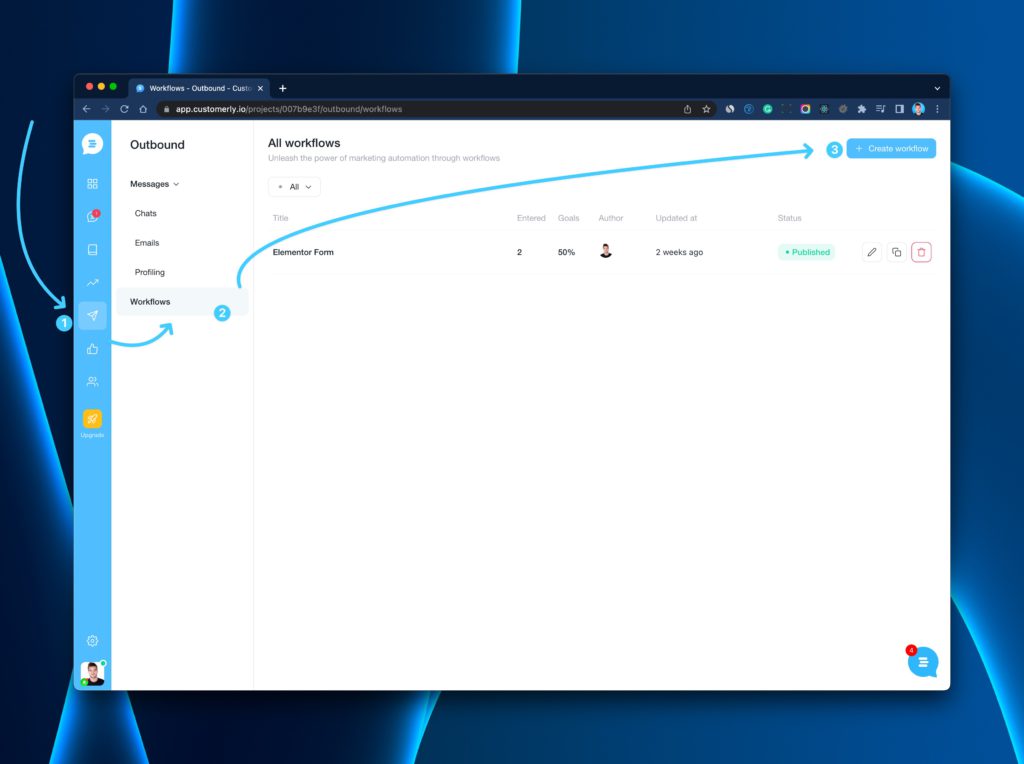
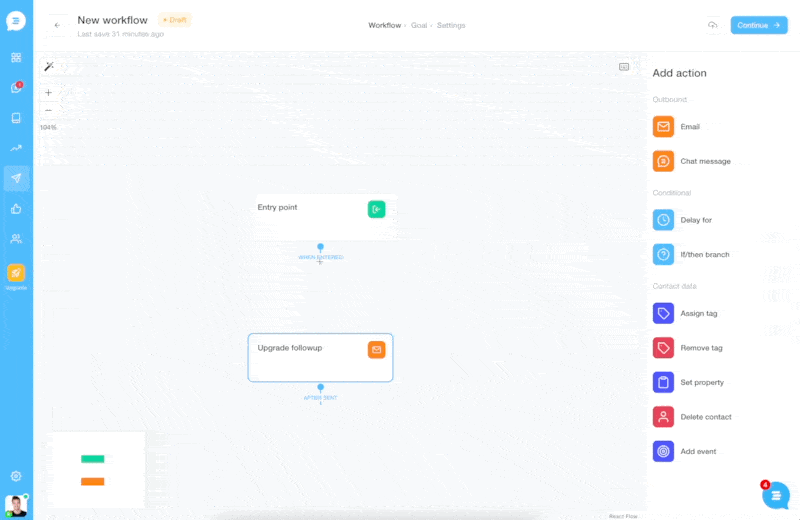
Step 1: Go to your Customerly dashboard, select Outbound, then Workflows, and click on Create Workflow in the top right corner.
Select the create-from-scratch workflow, and you will find the Entry point audience selector.
Step 2: Click on Add Filter, Select Event from the list.
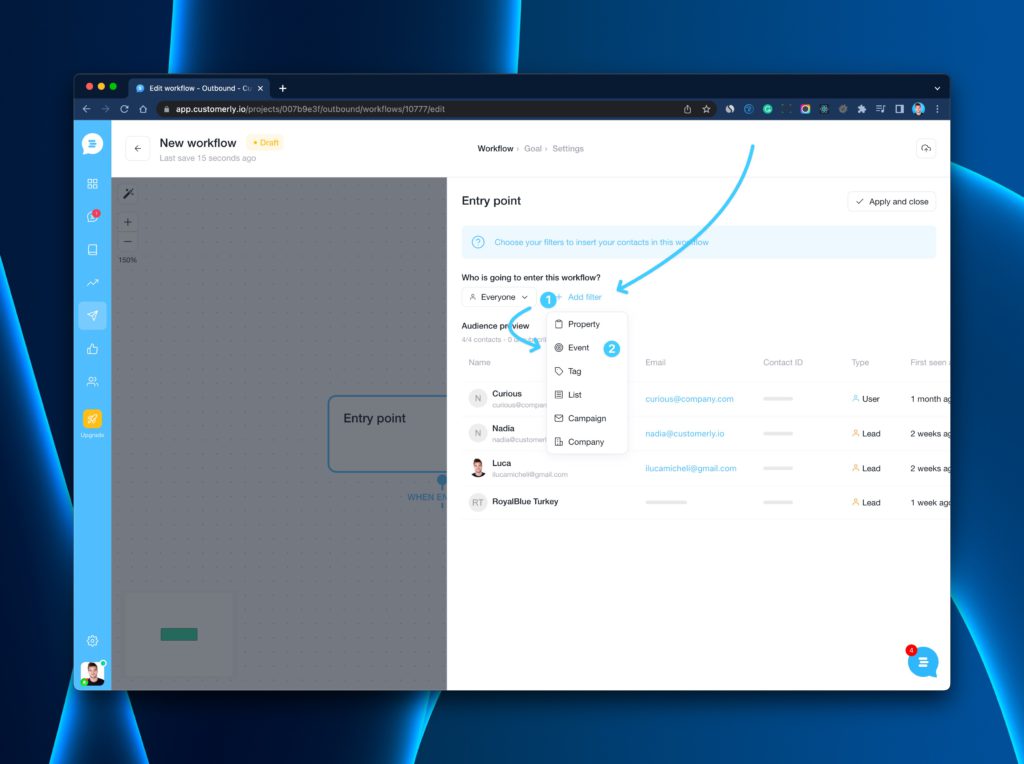
Step 3: Click on Choose event and Select the upgrade event.

This way, you will be able to see who clicked on the upgrade button immediately, but we have to exclude whoever started a free trial.
Step 4: Add another Filter on another event to exclude those who didn’t fire the event free trial started.
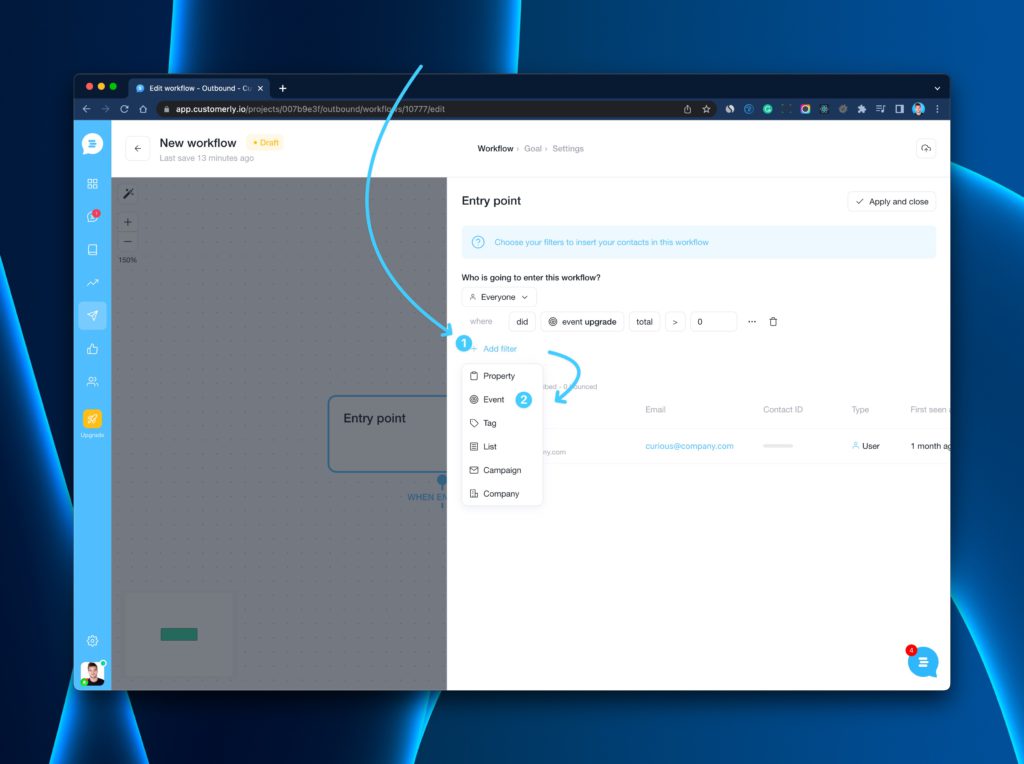

Now that we have selected the right audience based on the events the user triggered, you can add your email and automate this communication without touching a single line of code.
Let’s apply and close the Entry Point tab first.

Step 5: Drag & Drop an Email action to the Workflow
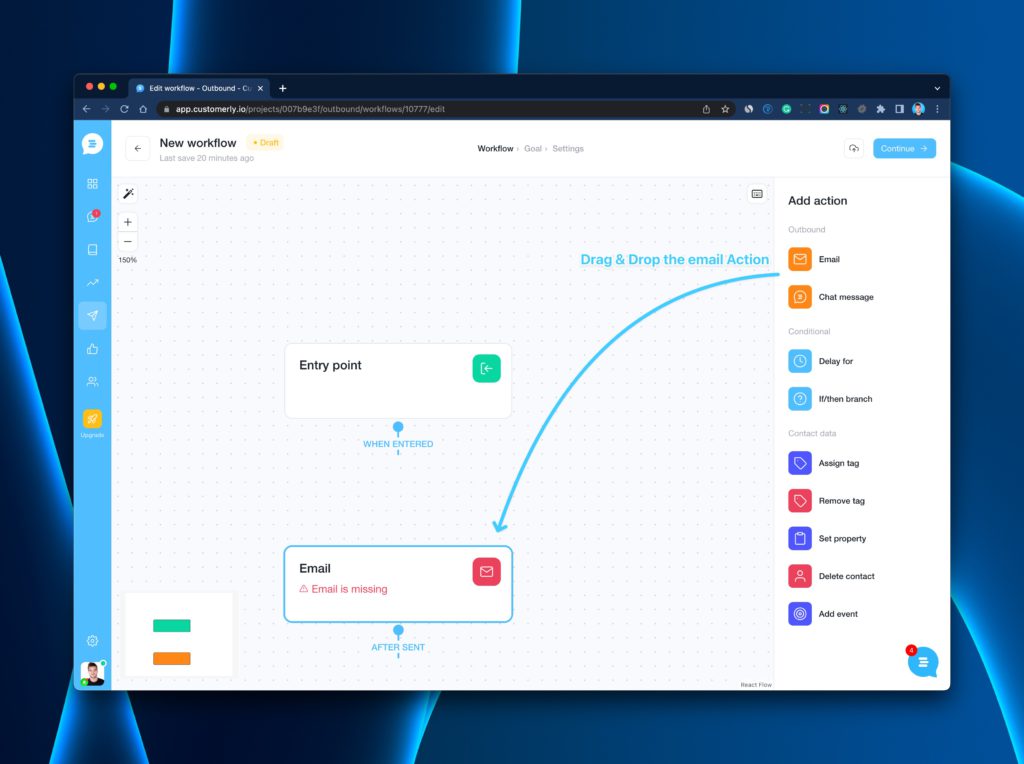
When you drop it, it will open the email template tab to choose from.
Step 6: Browse our community templates and select the one that suits you the best.
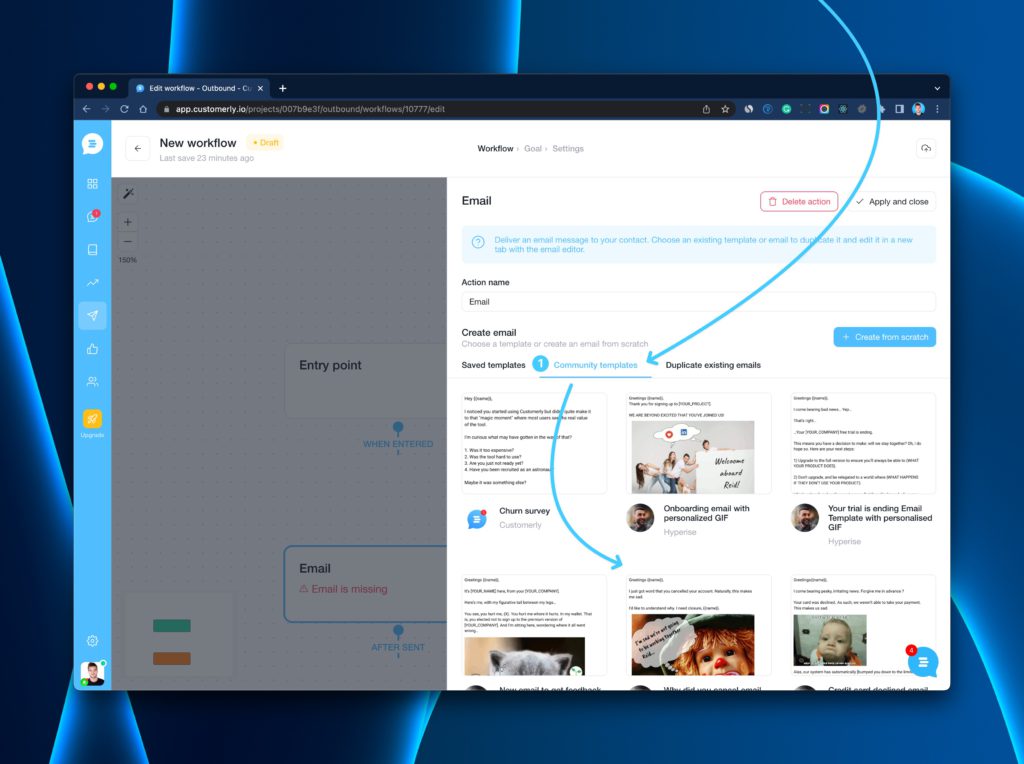
Once you have customized your email and optimized it for a better open rate, you only need to connect the Entry point to the Email like this.
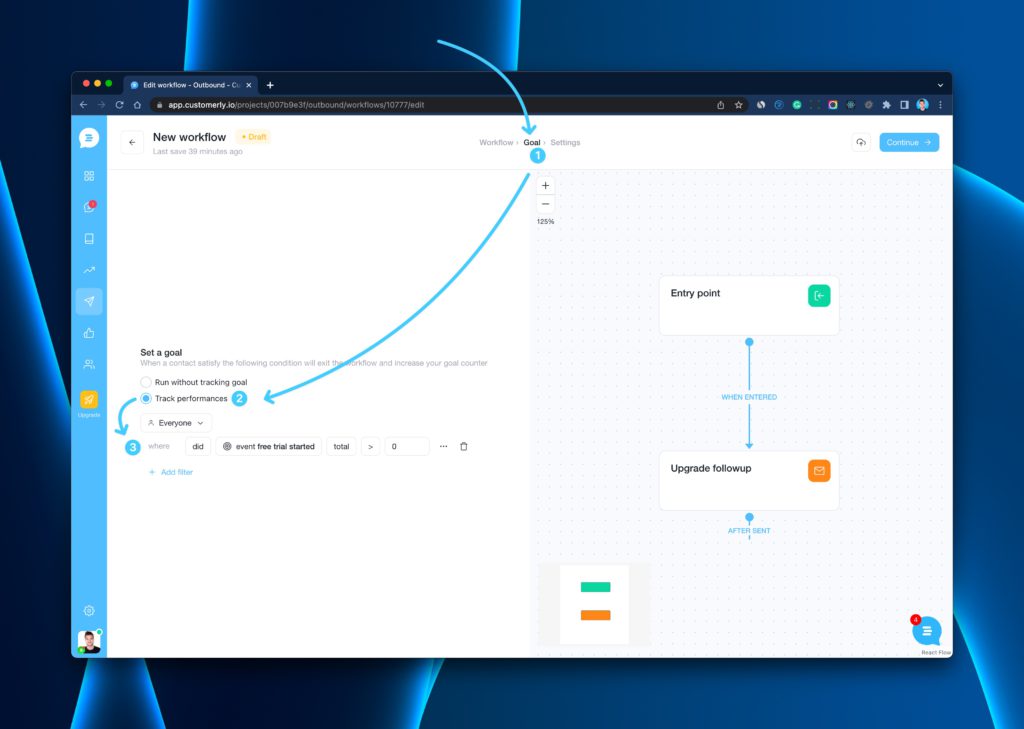
Set a goal to track performance
Now you can set up a goal for this Workflow to see how many people entered this workflow has been converted into a free trial activated.
To track performances:
- Click on Goal
- Click on Track Performance
- Add the relevant event you want to track. E.g. Free trial Started
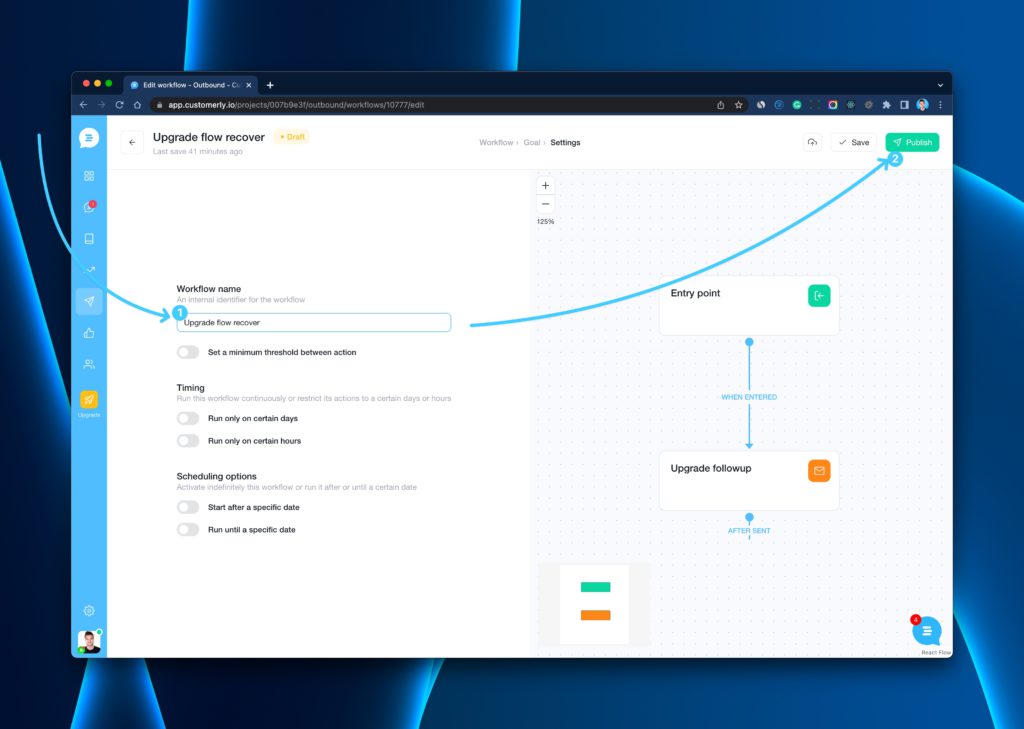
Everything is ready to work for you. Let’s add a name for your workflow and publish it!
And that’s it! Enjoy your automated series of emails.
Conclusions
Now you can repeat the process to recover high intent of purchase from your user on different parts of your software.
Now that you know how to create an automated email communication based on your user behavior without writing a single line of code, thanks to proper event tracking in Google Tag Manager, you are ready to get more marketing results.
Automate Smarter with
Customerly Aura
Related articles
Get the latest strategies, tips, and trends in customer service Learn how to deliver exceptional customer service and boost customer loyalty.